

How To Draw An Anchor
MKayo is an creative person who specializes in providing elementary, easy-to-follow drawing tutorials for beginners.

Learn how to depict an ballast with this uncomplicated, step-by-step tutorial!
All images ©2013 MKayo
Ballast Drawing: A Simple and Like shooting fish in a barrel-to-Describe Blueprint
Before I begin with the drawing tutorial, I like to requite y'all some interesting information about anchors. Every bit a working professional artist for almost l years, I have learned that information technology helps to go familiar with your subject before yous begin drawing. Trust me, it really helps.
There are basically ii master theories near the origin of the anchor. The commencement theory states that equally primitive homo learned that a log would float, he knew he could ride that log and float as well.
Soon man learned that strapping two or more than logs together worked fifty-fifty improve and could carry more people or cargo. At some point on one of those early on rafts, some guy figured that the log raft needed to stop. A light seedling appeared over his head, and the thought for an anchor was born.
The other theory is that the gods endowed primitive humankind with the skill of seamanship, which also included basic data on anchors. Archeologists are yet looking for that outset anchor owner's transmission.
The first anchors were probable made out of stones that could exist drilled for connecting the stone to a rope or line. In the early days earlier metalworking, high-temperature furnaces and mining came into widespread utilize; metallic was difficult to work with and far too precious to be used as fabric for an anchor.
As humankind progressed and applied science immune piece of cake working of metals, the modern-day fe or steel anchor was adult. Today there are basically four types of anchor in use. These are the Navy, Plow, Danforth, and Mushroom style anchors.
The type of ballast we will exist drawing today is a Navy-kedge-type ballast.
And then, enough of anchor history 101. Let's start cartoon.
Get a pencil and a pad of newspaper, and allow'due south brainstorm . . .
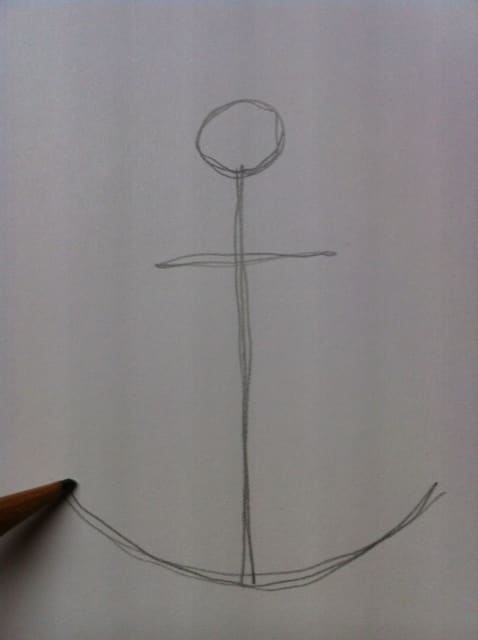
Step i. Begin drawing the basic shapes and outlines of the anchor.
Step 1. The Basic Shapes and Lines of an Anchor
With any drawing, you lot always want to start with a few basic shapes and lines.
Drawing an anchor is elementary if you just follow forth with these easy-to-follow steps:
- First, draw a straight vertical line that goes upward and down. This is the shank.
- From that line, extend a shorter horizontal line about one-fourth of the way from the meridian of your vertical line. This is the stock.
- Adjacent, draw a slightly curving line at the bottom of the vertical line. These are the flukes.
- Finally, add a smaller circle at the top of the vertical line. This is the ring.
These are the basic shapes of a kedge-type anchor.
Read More From Feltmagnet
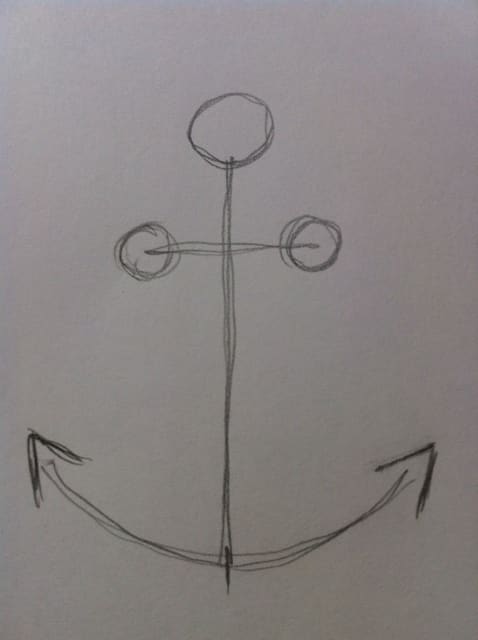
Pace 2. Add in the flukes and foundation for the crown of the anchor.
Step 2. Add Some Bones Details
For this footstep, we're going to add a few more foundational details.
- On each end of the stock, add a small circle, as shown in my drawing.
- Toward the bottom, on the curving line, we're going to draw ii points similar an arrow. These are the flukes of the anchor.
- In the heart of the curving line (flukes), add a small signal. This will be the crown of the anchor.
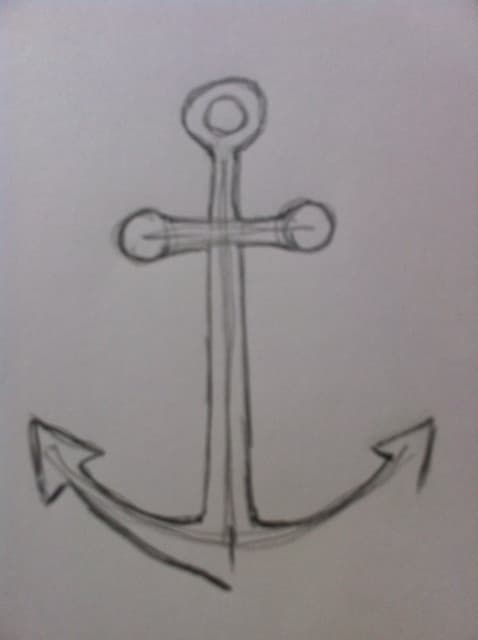
Footstep 3. Add together weight and dimension to the anchor.
Pace iii. Add Some Weight to Your Anchor
For this step, you're just going to add together some weight and dimension to the anchor.
To do this, simply make an outline around the basic lines you drew in step 1.
Study my cartoon, or an bodily picture of a kedge anchor, and endeavor to depict your lines equally yous run across there.
Find that I have left the initial guidelines in the drawing. We'll make use of these later.
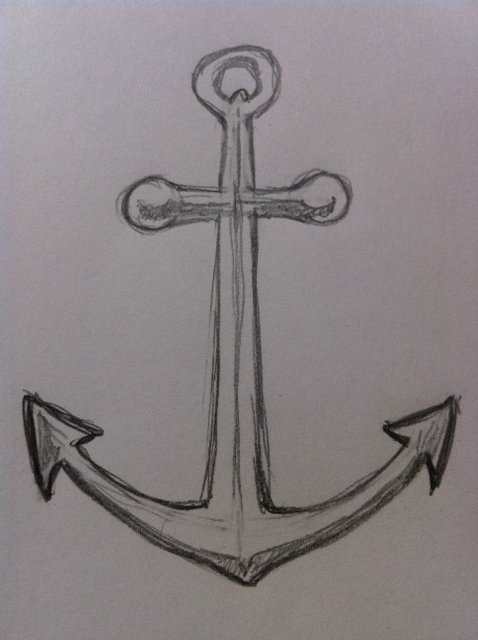
Step 4. Finish outlining the anchor.
Step 4. Finish the Basic Outline
As you can see by my drawing above, I have outlined the entire anchor.
I have also strengthened these lines by bearing down on my pencil a fleck harder. This gives a strong, solid outline for the anchor.
On some areas of the stock and flukes, I have added some additional shading to give the ballast some depth and dimension.
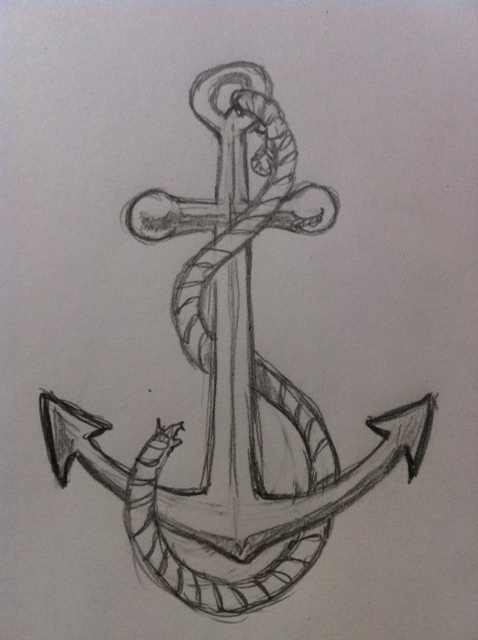
Footstep 5. Add the finishing touches—a strong rope.
Step 5. The Finishing Touches
For the final step, I wanted to add one additional item: a potent rope.
To draw this rope, just make a light outline of where you desire the rope to be positioned in your drawing.
I added some small lines all along the length of the rope to appear equally the winding strands.
Take note, especially of the places where the rope appears in front of and backside the ballast.
This is not difficult to do if yous simply pay attention to exactly what you lot're drawing.
Recall, erasers are on the other terminate of a pencil because people brand mistakes. If you brand a fault, only erase it and brainstorm again.
Practise Makes Perfect!
Then, how did you do? Are you satisfied with the appearance of your anchor cartoon?
If it doesn't wait perfect, that is totally natural. Drawing is a learning process in which future power is based on the number of previous cartoon experiences. Just put, that means you're going to get amend with each cartoon.
Practice every day, and you will get better. After 50 years, I withal practise sketching or painting every day. And every drawing or painting is imperfect. No matter how practiced I get—even after 50 years—I still run across imperfections in my art. Then, if your drawing isn't perfect, you're in good company.
Practiced luck!
© 2022 MKayo
Khalifa on June 29, 2022:
Rlly good. I like your drawing.
hi on June 28, 2022:
I like the pic
Jazmin on November 12, 2022:
I like the picture but could y'all at to the lowest degree make more than simpler than what y'all got it
Madison on October 14, 2022:
Thank you so much it helped and so much still turned out funky
JJ on April 06, 2022:
This is so easy once yous get the elements right!
~Thanks!
wolf on Dec 28, 2022:
it was so like shooting fish in a barrel simply perfect for a rainy 24-hour interval
Zoe on Nov 08, 2022:
thanks, it was proficient for my schoolhouse study
Paula on September 05, 2022:
I found everything hard i idea it would be easier but its difficult as f.
Josh on December 16, 2022:
That's was really and then easy . I found it very piece of cake to describe the rope
Lance Brinkmeyer on November xxx, 2022:
Was very easy because if institute what i do best when i draw which is steps. But had trouble with the lines for the ropes when the turn came upwardly i had trouble adjusting them
lacie kilgore on Oct 26, 2022:
I feel like this really tout me something with the steps and element of desighn
Isabella on Oct 17, 2022:
I feel like you should requite us the step by step for the rope equally well, because I establish the rope the about challenging thing, and past the looks of the poll, others are right there with me.
Ari on July 27, 2022:
Wow this was so simple thank you very much :) :) :)
Nicolle on April 29, 2022:
I had trouble on adding the rope and doing the bottom role of the drawing- kinda what holds upwards the ballast.
Faye on March 10, 2022:
Thanks for helping me draw an ballast. I paint but don't draw. You lot are very helpful cheers again. I volition keep checking your sight
BPO on Feb 15, 2022:
great chore MKayo
Frank on January 26, 2022:
Bang-up ! I wish that I can bear witness yous, when done. I'chiliad going to pigment it on old wood, and hang it on my patio, at pool side.
Thank you much
Frank
Ji ji on October 11, 2022:
I love it!!!
MKayo on August 28, 2022:
Timmy - hey, continue trying. It took me a long time to acquire to depict but I practice every 24-hour interval. Yous tin can do this!
Lara - great! For some folks it'southward easier.
Thanks to both of yous for reading this article! Chiliad
Lara on Baronial 28, 2022:
Dang!Thats so easy like it blew my mind my mom was then happy!
Timmy on August 06, 2022:
I love the anchor drawing!! I tried but failed
MKayo (author) from Texas on May 07, 2022:
Thank you for stopping by and taking the time to go through my Hub, FatBoyThin! Hope you enjoyed it. One thousand
Colin Garrow from Inverbervie, Scotland on May 03, 2022:
This is a actually neat method - love the step-past-step process. Swell tutorial and groovy Hub.
Ana Maria Orantes from Miami Florida on April 05, 2022:
Wow, I said when I fisrt saw your art talent. And then I stay reading how yous exercise information technology. Thank you again genious heed. Blessing to you again.
Kristen Howe from Northeast Ohio on Apr 04, 2022:
someday MKayo.
MKayo (author) from Texas on April 04, 2022:
Wow, thanks for the visit and for the kind words, erorantes! Glad yous liked it. Grand
Kristen - thank you for the vote up! Chiliad
Ana Maria Orantes from Miami Florida on April 04, 2022:
I like the anchor. You do information technology the easiest fashion. I like that nearly your talent. Congratulations for what you depict. I am sure. You have many pictures. I am looking frontward seeing you other art piece of work. Blessing to you. Thank yous for your beautiful hub.
Kristen Howe from Northeast Ohio on March 24, 2022:
Very nice crawly sketch hub. It looks and then piece of cake to do. Voted upwards!
MKayo (writer) from Texas on Baronial 01, 2022:
You're quite welcome. Thank you for the annotate!
Natasha from Hawaii on August 01, 2022:
I love information technology when I find what I'grand looking for on HubPages! =) Thanks for the tutorial.
MKayo (author) from Texas on February 22, 2022:
Thanks for the kind comments. Glad y'all liked it!
Tolovaj on February 21, 2022:
Beautifully presented. I believe even somebody similar me, with ii left hands, tin describe an anchor or similar particular. Thank you for the explanation of the origin of anchors too:)

Source: https://feltmagnet.com/drawing/How-to-Draw-an-Anchor
Posted by: herediaextre1997.blogspot.com
0 Response to "How To Draw An Anchor"
Post a Comment